
A friend writes - “Any suggestions on how to combine the Google photo
library with iPhoto. Which is a better platform for keeping the photos?
Google seems to be very handy in sorting and searching. Would love to
know your views”
I am a big fan of Google Photos for several reasons - you get unlimited storage space, Google is pretty good at visual image search and you can have collaborative photo albums where multiple people can upload to a common folder.
If
you would like to copy your photos from iCloud / Apple Photos to Google
Photos, there are no browser plugins or software that can automate this
- you’ll have to manually transfer the picture library from Apple to
Google Photos. Luckily, that migration process isn’t difficult either.
It is a two-step process - you download the photos from iPhoto and iPad to your computer via iCloud and then put them on to the Google Cloud. Let’s see how:

Inside iCloud, sign-in with your Apple ID, then open the File Explorer window, click on
Select one or more photos, then go to the File menu and choose Export to download pictures from Apple Photos to another folder on your desktop.

For the export options, you may stick to the default values but do check the “Include Location Information” option. This will help Google group your photos by location.
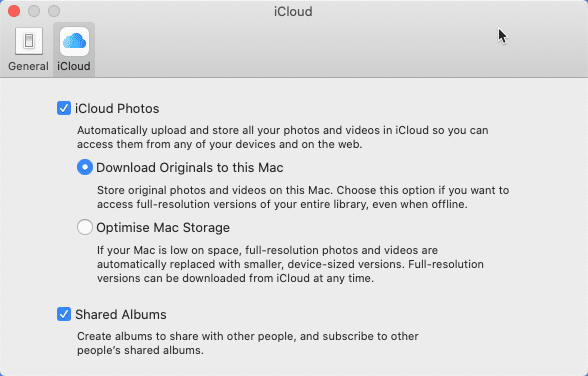
Also, if you aren’t seeing all your iPhone photos inside Mac, go to Preferences inside the Photos app and make sure that the Download originals to this Mac option is checked under the iCloud Photos section.
The browser should remain open and your Internet connection should be working for the upload to happen in the background.
I am a big fan of Google Photos for several reasons - you get unlimited storage space, Google is pretty good at visual image search and you can have collaborative photo albums where multiple people can upload to a common folder.
Transfer Photos from Apple iCloud / Mac to Google Photos
It is a two-step process - you download the photos from iPhoto and iPad to your computer via iCloud and then put them on to the Google Cloud. Let’s see how:
Step 1: Download Photos from iCloud
Via Web Browser
ou may directly go to the icloud.com/photos website, select your photos and then click the download button to save them from the iCloud library to your Windows PC or Mac.

On Windows PC
If you have photos on your iPhone or iPad that are getting backed up on iCloud, you can copy them to your Windows PC with iCloud for Windows.Inside iCloud, sign-in with your Apple ID, then open the File Explorer window, click on
iCloud Photos under Quick Access and then choose Download photos and videos.On Apple Mac OS
Open the Apple Photos app on your Mac and press ^1 (Ctrl+1) to switch to the main Photo view that has a list of all pictures that are available in your iPhoto library.Select one or more photos, then go to the File menu and choose Export to download pictures from Apple Photos to another folder on your desktop.

For the export options, you may stick to the default values but do check the “Include Location Information” option. This will help Google group your photos by location.
Also, if you aren’t seeing all your iPhone photos inside Mac, go to Preferences inside the Photos app and make sure that the Download originals to this Mac option is checked under the iCloud Photos section.

Step 2 - Upload Photos to Google Photos
Once you have saved the photos that you wish to transfer to your local drive, you need to send them to Google Photos and there are two ways to go about it.Upload Photos via Web Browser
Open Google Chrome, or any other web browser, and go to photos.google.com. Simply drag the photos folder from your desktop to the Google Photos website and they’ll be uploaded in sequence.The browser should remain open and your Internet connection should be working for the upload to happen in the background.
No comments:
Post a Comment